Connected Cache
I started exploring Microsoft Connected Cache (MCC) for Enterprise and Education as a potential enabler for transitioning endpoint managment from SCCM on-premise to Microsoft Intune in the cloud. Intune offers many new features and improved off-network reliability when compared with SCCM, but supporting this requires a strong connection to the internet. The Microsoft CDN traffic overwhelms my corporate network's small and heavily utilized WAN links, making local caching and peering essential for reducing network congestion. I thought this couldn't be done until I saw MCC.
MCC for Enterprise and Education is currently in preview, which means features are still under development and may not work as expected (as I’ve discovered). Despite this, the final product has proven to be reliable and effective at caching Windows, Office, and other Microsoft update content locally with minimal management overhead. While the MCC server is only one step in the process to achieve these benefits, it is the most critical if the network health is a priority.
Windows Setup
I’ll be walking through the Windows setup of MCC in this guide as that fits my use case. Due to the layers of virtualization in Windows Subsystem for Linux (WSL) required to run MCC on Windows, I would recommend exploring the Linux setup of MCC to reduce complexity.
Requirements
- Licensing and technical prerequisites:
- Required network endpoints:
What You'll Need
- An Azure subscription with a resource group
- A supported system:
- Windows Server or Windows 11
- Linux system (Red Hat 8/9 or Ubuntu 24.04)
Installation
Prepare the Server
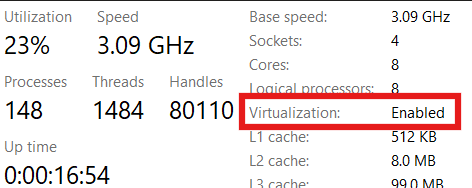
- I used a Windows Server 2022 VM. As listed in the requirements, nested virtualization must be supported. Confirm this in Task Manager:
- Install WSL with elevated PowerShell:
wsl --install --no-distribution
wsl --update
- Reboot the system to ensure WSL is properly registered.
Prepare Azure Resources
- In the Azure subscription, register the resource provider "Microsoft.ConnectedCache"
- Subscription -> Settings -> Resource Providers

- Subscription -> Settings -> Resource Providers
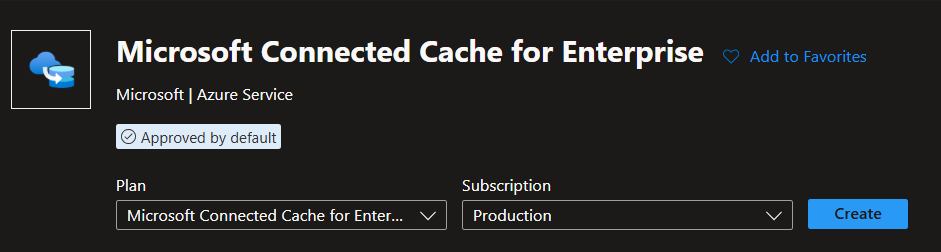
- From your resource group, create a Microsoft Connected Cache for Enterprise resource
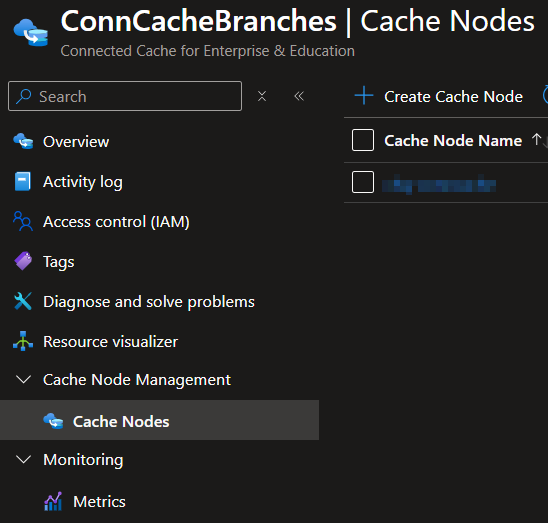
- Create a cache node. This node represents a single server with unique settings and install scripts. You have the option to choose Windows or Linux
- After creation, open the node to configure the following options:
- Cache size (e.g., 100 GB)
- Proxy (if required)
- Hostname (FQDN only, e.g., proxy.company.com)
- Port
- Save the configuration. The node will auto-generate the provisioning script. This may take a minute and requires a refresh of the page. Review the following instructions:
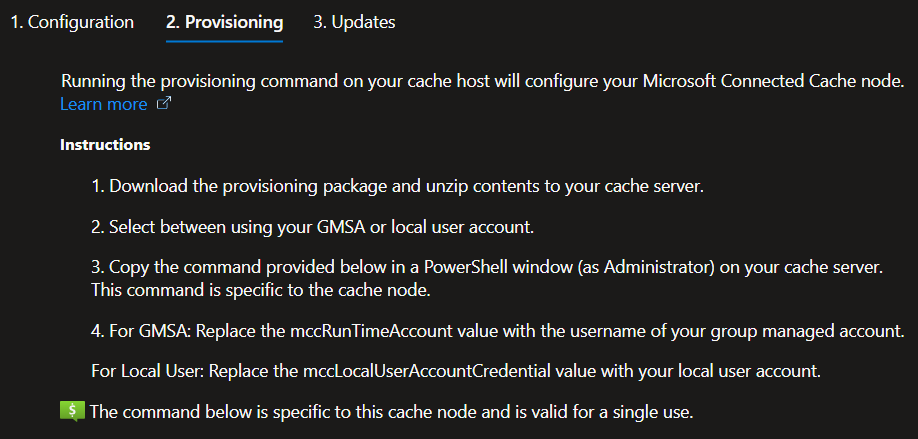
You have the option of choosing a GMSA, local or domain account. The account you choose will register tasks in Task Scheduler and run the WSL instance as that user.
Run Provisioning Script
- Download the provisioning package from the cache node configuration window and extract to a local folder. This package is not unique and can be reused for each cache node.
- I used a domain service account. Open an elevated PowerShell window, navigate to the directory where the install scripts were extracted and create the following variables:
$User = "Domain\User"$myLocalAccountCredential = Get-Credential "Domain\User"
- Run the provisioning script from the cache node configuration window. This command is unique to each MCC node and cannot be reused to install another node

- The installer will log to the terminal and the
InstallLogsdirectory under the installation folder specified in the install command. Default isC:\mccwsl01
This is the point where things went wrong for me. Without a good grasp on what was going on, I spent weeks going down rabbit holes and coming up with the wrong solutions. Troubleshooting article coming soon!
Behind the Scenes
The script tries to:
- Configure the host with WSL, firewall rules and port forwarding to redirect port 80 requests from the host to WSL
- Import an Ubuntu image into WSL
- Download and execute scripts to configure Azure IoT Edge containers in Ubuntu
- Download the latest MCC container image from Microsoft's repository and install in Ubuntu
- Verify the node is downloading, caching and serving content successfully
Check the Status
If the installation is successful, the C:\mccwsl01\InstallLogs\WSL_Mcc_Install_FromRegisteredTask_Status log will show successful image downloads and HTTP 200 content requests. 
Review Microsoft's article to verify the cache node is working correctly. Start by running wget from the VM:
wget http://localhost/filestreamingservice/files/7bc846e0-af9c-49be-a03d-bb04428c9bb5/Microsoft.png?cacheHostOrigin=dl.delivery.mp.microsoft.com
If successful, you will receive an HTTP 200 response.
Make an HTTP request from any device that the MCC server will serve content to:
http://[MCC-IP-address]/filestreamingservice/files/7bc846e0-af9c-49be-a03d-bb04428c9bb5/Microsoft.png?cacheHostOrigin=dl.delivery.mp.microsoft.com
If successful, the device will download a PNG from the cache server.
Back in the Azure portal, the cache node will show a status of 'Healthy' and show the currently installed version.

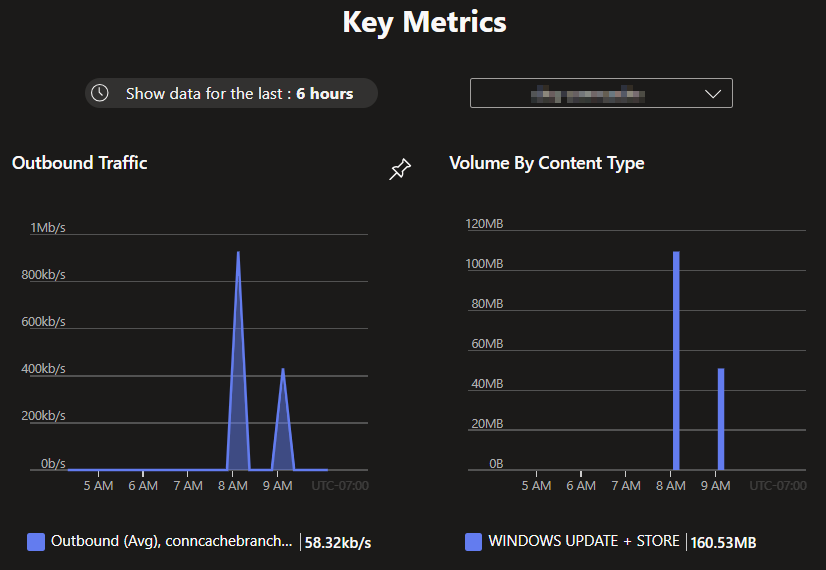
Performance metrics will be visible in the 'Overview' tab. Detailed metrics can be viewed in the 'Metrics' tab. The charts will be blank until devices are configured to use the MCC server and perform download activities.
Next steps
The MCC server is now ready to servce cached Microsoft update content to any client that asks! Stay tuned for the next post on how to configure devices to use the MCC server effectively.
Resources
AZ Commands
The AZ CLI supports creation of Connected Cache resources and nodes with the following commands. These commands are in preview, so stay up to date with the documentation!
Create Connected Cache Azure resource. https://learn.microsoft.com/en-us/cli/azure/mcc/ent/resource
$subscription = "Production"
$mccResourceName = "ConnCacheBranches"
$resourceLocation = "westus"
$resourceGroup = "ConnCacheBranches"
az account set --subscription $subscription
az mcc ent resource create --mcc-resource-name $mccResourceName --location $resourceLocation --resource-group $resourceGroup
Create Connected Cache node. https://learn.microsoft.com/en-us/cli/azure/mcc/ent/node
$subscription = "Production"
$mccResourceName = "ConnCacheBranches"
$resourceLocation = "westus"
$resourceGroup = "ConnCacheBranches"

$cacheNodeName = "Office1"
$cacheNodeOperatingSystem = "Windows"
$driveSizeGB = "100"

$proxy = "enabled"
$proxyHost = "proxy.company.com"
$proxyPort = "80"

$autoUpdateRing = "slow"
$autoUpdateDay = "6" #Saturday
$autoUpdateTime = "00:00" #midnight UTC.
$autoUpdateWeek = "4"

az account set --subscription $subscription
az mcc ent node create --cache-node-name $name --mcc-resource-name $mccResourceName --host-os $cacheNodeOperatingSystem --resource-group $resourceGroup
az mcc ent node wait --created --cache-node-name $name --mcc-resource-name $mccResourceName --resource-group $resourceGroup
#Configure cache node
az mcc ent node update --cache-node-name $name --mcc-resource-name $mccResourceName --resource-group $resourceGroup --cache-drive "[{physical-path:/var/mcc,size-in-gb:$driveSizeGB}]" --proxy $proxy --proxy-host $proxyHost --proxy-port $proxyPort --auto-update-ring $autoUpdateRing --auto-update-day $autoUpdateDay --auto-update-time $autoUpdateTime --auto-update-week $autoUpdateWeek