Connected Cache Troubleshooting
September 2025 Update: This article was written using the preview version of MCC, which has since been updated to global availability. Some features may have changed and issues may have been fixed.
After a long 3 weeks of fumbling around with Microsoft Connected Cache (MCC) and the underlying technologies, I determined that the issue with my deployment ultimately stemmed from the lack of proxy support in the installation scripts. While the root cause of your problem will most likely be different from mine, the steps listed below are a good start to diagnose several possible issues and to aid general understanding the of the application.
I'll be covering the installation of MCC on a Windows 2022 Server with unauthenticated proxy support.
Start your troubleshooting journey here: https://learn.microsoft.com/en-us/windows/deployment/do/mcc-ent-troubleshooting#troubleshooting-cache-node-deployment-to-windows-host-machine
The installation failed on the 'Waiting for MCC container to become available' step: 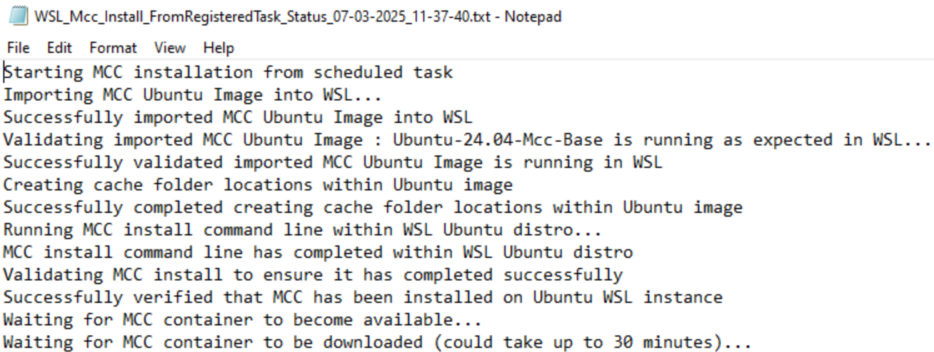
Step 1: Why is it failing
"Waiting for MCC container to be downloaded..." is generated by installmcconwsl.ps1 and the following section:
while (!(Wait-ForMccContentToReturn))
{...}
The function 'Wait-ForMccContentToReturn' is located in utilities.ps1:
function Wait-ForMccContentToReturn()
{
    try
    {
        $Bytes = [system.Text.Encoding]::UTF8.GetBytes("key=value")
        $Web = [net.WebRequest]::Create("http://127.0.0.1:80/mscomtest/cedtest/r20.gif") -as [net.HttpWebRequest]
        $Web.ContentType = "application/x-www-form-urlencoded"
        $Web.Host = "b1.download.windowsupdate.com"
        $Web.Method = "GET"
        $response = $Web.GetResponse()

        if (($response.StatusDescription).ToUpper() -eq "OK")
        {
            return $true
        }
        else
        {
            return $false
        }

    }
    catch
    {
        return $false
    }
}
MCC is a web server running in a container in WSL. The installer is checking to see if a successful web request can be made to localhost over port 80. This web request does not seem to be working.
Step 2: Check networking
The installation scripts create a firewall and port forwarding rule to take the request from the host VM and route it to the WSL container. More information: https://jwstanly.com/blog/article/Port+Forwarding+WSL+2+to+Your+LAN/.
Confirm the configurations have applied successfully:
Get-NetFirewallRule -DisplayName "WSL2 Port Bridge" | Select DisplayName,Enabled,Direction,PrimaryStatus
netsh interface portproxy show v4tov4
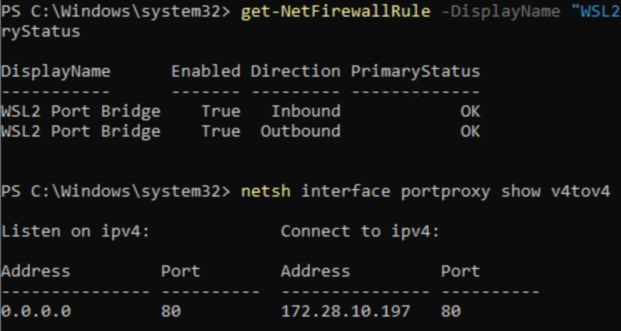
Looks good. Lets see if the cache server is running and able to accept HTTP requests.
Step 3: Check container
Installing MCC uses a service account to run the WSL instance. Due to security limitations in my environment, I'm not able to run this account interactively. Running WSL as my own account returns no results as the instance is running under a different user. Psexec might be able to work around this limitation, but I set up a task in Task Scheduler with the same service account to run a PowerShell script on demand.
Task scheduler config:
- Action: Start a program
- Program/script:
C:\Windows\System32\WindowsPowerShell\v1.0\powershell.exe - Add arguments:
-ExecutionPolicy Bypass -command C:\temp\mccTroubleshooter.ps1 2>&1 > C:\temp\MCCLog.log"
So, by adding some commands to the PowerShell script C:\temp\mccTroubleshooter.ps1, we can see the output in C:\temp\MCCLog.log. For example, the following command will instruct the 'Ubuntu-24.04-Mcc-Base' image running in WSL to run the bash command ip addr in the image.
& 'C:\Program Files\wsl\wsl.exe' -d 'Ubuntu-24.04-Mcc-Base' bash -c "ip addr"
MCC uses Azure IoT containers to handle the requests and management of the application. To check the containers, run the command sudo docker ps. Expect to see three images running.

In my case, only the 'azureiotedge-hub' and 'azureiotedge-agent' images were running. The image named 'msconnectedcacheprod1.azurecr.io' was supposed to be downloaded from the internet by the installer but seemed to have failed.
Step 4: Check networking (again)
Microsoft provides a list of network endpoints that must be reachable for MCC to function properly https://learn.microsoft.com/en-us/windows/deployment/do/delivery-optimization-endpoints. Pay special attention to the endpoints for 'IoT Edge / IoT Hub communication'. Check your organizations firewall to determine if the listed endpoints are allowed, in addition to performing DNS and ping checks from within the WSL instance.
Example:
ping global.azure-devices-provisioning.net
You should check all those endpoints manually, but I have a shortcut :).
As mentioned before, MCC is using Azure IoT images. This means that all Azure IoT troubleshooting steps also apply to MCC. We will use the command iotedge check to run a collection of configuration and connectivity checks automatically. More information here: https://learn.microsoft.com/en-us/azure/iot-edge/troubleshoot.
I found, through agonizing trial and error, that the URL representing the on-prem Azure IoT image must be added to the command to correctly check connectivity. This URL is referred to as the 'IoT Hub Hostname'. We can grab that by running the following command in WSL:
sudo docker inspect edgeAgent | grep 'IOTEDGE_IOTHUBHOSTNAME'
Returns a value like this: iotc-00000000-0000-0000-0000-000000000000.azure-devices.net. Use this value in the following command:
sudo iotedge check --verbose --iothub-hostname iotc-00000000-0000-0000-0000-000000000000.azure-devices.net
If you are using a proxy, you must add a proxy parameter as shown below. Use the URL format http://proxyurl.com:port. The proxy used here is unauthenticated, so additional credentials were not required.
sudo iotedge check --proxy-uri http://proxy.company.com:80 --verbose --iothub-hostname iotc-00000000-0000-0000-0000-000000000000.azure-devices.net
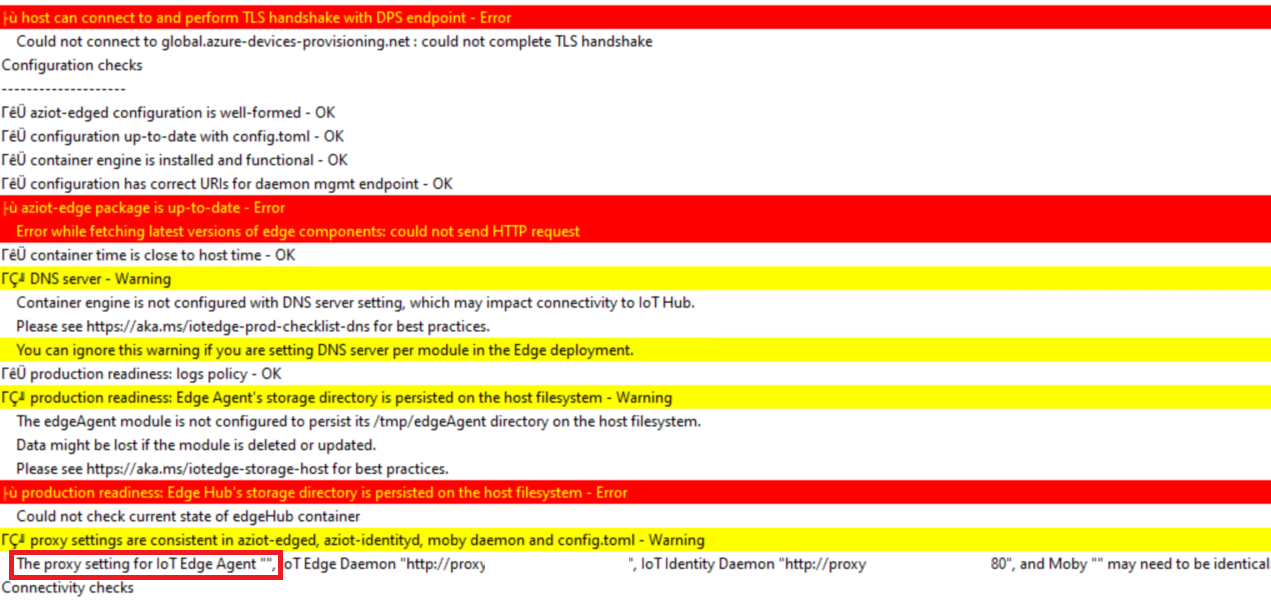
The output of the command will contain a 'Connectivity Check (aziot-identity-service)' section.
host can connect to and perform TLS handshake with iothub AMQP port - Error
    Failed to do TLS Handshake, Connection Attempt Timed out in 70 Seconds
        caused by: Failed to do TLS Handshake, Connection Attempt Timed out in 70 Seconds
        caused by: deadline has elapsed
host can connect to and perform TLS handshake with iothub HTTPS / WebSockets port - OK
host can connect to and perform TLS handshake with iothub MQTT port - Error
    Failed to do TLS Handshake, Connection Attempt Timed out in 70 Seconds
        caused by: Failed to do TLS Handshake, Connection Attempt Timed out in 70 Seconds
        caused by: deadline has elapsed
host can connect to and perform TLS handshake with DPS endpoint - OK
This tells us four things:
- Connection failed over AMQP
- Connection succeeded with HTTPS / Websockets
- Connection failed over MQTT
- Connection succeeded with DPS (Device Provisioning Service)
Azure IoT supports two protocols for communicating back to the Azure IoT hub: MQTT and AMQP. Another option is supported, which is to tunnel AMQP traffic over port 443, called AMQP over WebSockets (AmqpWs). More information: https://learn.microsoft.com/en-us/azure/iot-hub/iot-hub-devguide-protocols.
MQTT and AMQP ports are being tested as part of the default connectivity checks, but this does not mean they are necessary for MCC to function. In my environment, AMQP and MQTT were failing with TLS timeouts, and AmqpWs appeared to be working when running iotedge check with proxy support. So why was I still getting errors in the application logs? Let's take a look at the AmqpWs setting in the config files.
Step 5: Azure IoT Settings
Azure IoT settings are found in /etc/aziot/config.toml. I viewed the contents with cat /etc/aziot/config.toml.
[agent.env]
"UpstreamProtocol" = "AmqpWs"
"https_proxy" = ""
The agent.env section shows that no proxy was configured, despite configuring the only available proxy settings (from the web GUI).
This can be confirmed more simply in the proxy settings section of the iotedge check output. I saw this early in the troubleshooting process and did not understand the implications at the time :(
Changing the config file to add the proxy URL fixed all communication issues and allowed MCC to function as expected.
[agent.env]
"UpstreamProtocol" = "AmqpWs"
"https_proxy" = "http://proxy.company.com:80"
This issue was fixed by Microsoft with updates to the install scripts, but the time spent troubleshooting was both a loss of valuable time and a benefit of experienced gained. Just preview feature things!
But the fun continues...
Step 6: Reinstall and... it stopped working?
Downloading the newest version of the scripts caused the installation to fail once again, this time with a 'certificate verification' error. The updates to the install scripts contained the fix for the proxy issue, but also added new processes.
When the main PowerShell installation script runs, it downloads the latest Linux scripts to run inside WSL. A new script block was added to provisionmcc.sh that validates the certificate of the connection being used. Once again, the unauthenticated proxy in my environment collided with the lack of proxy support in the install scripts, causing terminating errors. The quickest fix I found was to edit out the new section and replace with the below script block after provisionmcc.sh automatically downloads and before provisionmcc.sh is called by the installing script (you have 2-3 minutes to do this).
Remove line 286 - 314:

And replace with:
printDetailMagenta "Calling to retrieve registration endpoint"
GeoResponse=$(curl --insecure -i 'https://geomcc.prod.do.dsp.mp.microsoft.com/geo')
KvEndpointUrl=$( echo $GeoResponse | grep -Po '"KeyValue_EndpointFullUri":.*?[^\\]",' | tr "," "\n"  | cut -d "\"" -f4 | cut -d "/" -f3)
printDetailGreen "Successfully called to retrieve registration endpoint"
printDetailMagenta "Attemtpting to retrieve overrides for this cache node"
DoincCustomerId="doincCustomerId=${CommandLineCustomerId}"
DoincCustomerKey="&doincCustomerKey=${CommandLinePrimaryKey}"
KvVersionUri="${Https}${KvEndpointUrl}${OverrideToolName}${DoincCustomerId}${DoincCustomerKey}"
KvOverrideResponse=$(curl -i ${KvVersionUri})
printDetailGreen "Successfully retrieved overrides for this cache node from $Https$KvEndpointUrl"
If done correctly, the new script block will bypass the certificate check and allow the installation to proceed as normal. Hopefully this issue will also be fixed in upcoming script updates.